
Those Dirty, Rotten Beams - Page 3
 |
 |
|
|
Preventive maintenance
Experts agree that an ounce of prevention, which includes caulking, filling, and painting, is worth a pound of cure. “I recommend looking at [the condition of] your beams once a year, before winter, because that’s when you get all of your wet weather,” Spehar says.
“Keep the beams painted every two years on the top, sides, and bottom,” Larson adds. “Too often people paint only what they can see, and they forget the top. Big mistake. That’s where the water damage begins.”
“Homeowners will often slap on a 30-year paint,” chimes in Gomes, “and assume they are done with maintaining beams for 30 years. Not so. You still have to keep tabs on the structure. If you see the wood open up, add caulk and repaint it.”
Year-round vigilance of your home’s entire moisture barrier is the best first step in preventive maintenance. “Get accustomed to walking around your entire house and looking at each surface,” Larson says. Caulk or fill any small areas that need attention.
“By the time a customer calls me, it’s usually too late,” he says. “Instead, they could have been walking around touching up.”
 |
Restoring lost beam endings
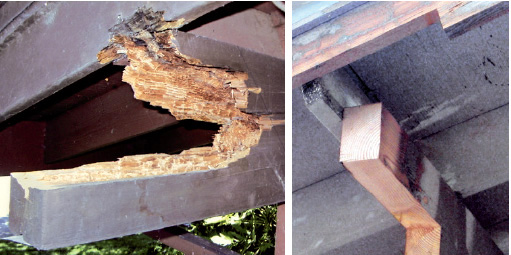
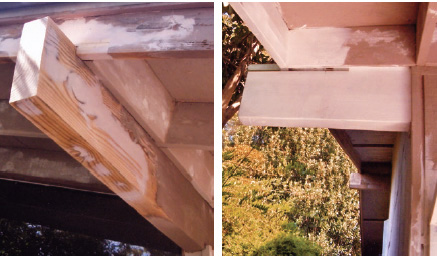
What does one do when rot is confined to only the ending of a beam? How does an Eichler or Streng homeowner restore those important lost inches of vital integrity and aesthetics on a corrupt or chopped-off beam?
We discovered two distinctly different solutions for capping failed beam endings—solutions that generally clock in at about $700 a beam, sometimes less.
“Usually the damage starts at the very top, at the connection to the fascia tile above the beam,” explains Adam Ramirez of Davis-based RETRObeam Restorations. “Some are very obvious, some are just starting to decay.”
“If some of them look good, then we’ll get a ladder out, and I’ll see what’s going on,” says Joe Gomes. He adds of the diagnosis phase of beam repair, “Most of the time it’s just visual; you don’t even need to get up on a ladder.”
While similar in this phase, from there the two companies diverge in their approach to restoring the visual and structural integrity of a modern home. For Gomes, one key to replacing the rotted end of a beam is in choosing a good piece of wood.
“Never use new wood to put together with old wood,” he states of working on a mid-century home, noting that the newer material will often shrink with age and fail to maintain its proper connection with the existing beam. Of course, old-growth lumber is hard to come by in this day and age, but Gomes has his sources.
“They’re still out there; you just need to know the places to look,” says the second-generation contractor, noting that he visits lumber reclamation centers hunting for used headers. “Basically, you’re looking for the perfect piece of wood…because it’s got to look perfect when you put it on someone’s house.”
Noting that the repair generally costs between $400 and $700 per beam, Gomes provides a separate cost for each one that needs work, adding, “I evaluate every project as to how much it needs to be repaired. They’re individually priced depending on what needs to be done.”